1. Before Installation On Red hat Linux create file systems for Mysql.

/mysql –-----------------For Software
Instalation (Home Location)
/mysql/mysqldb/logs—-----Database Logs
/mysql/mysqldb/data1—----Original Data
/mysql/mysqldb/backups—--Backup Location
2. While installing the Red Hat
Linux By default Maria Db get installed, So uninstall maria db and remove the
Mariadb Lib files.
yum remove mariadb
mariadb-server (Command For Un-Install
Mariadb)
yum remove mariadb-libs (Command For Remove Mariab Libraries)
3. Copy Mysql Full Software Package.

4. First Install mysql-commercial-common-5.7.10-1.1.el7.x86_64.rpm
yum localinstall mysql-commercial-common-5.7.10-1.1.el7.x86_64.rpm


5. Then Install
mysql-commercial-libs-5.7.10-1.1.el7.x86_64.rpm
yum localinstall mysql-commercial-libs-5.7.10-1.1.el7.x86_64.rpm

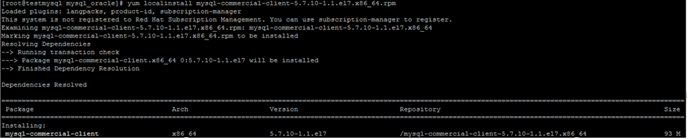
6. Then Install -commercial-client-5.7.10-1.1.el7.x86_64.rpm
yum localinstall
mysql-commercial-client-5.7.10-1.1.el7.x86_64.rpm

7. Then Install mysql-commercial-server-5.7.10-1.1.el7.x86_64.rpm
yum localinstall
mysql-commercial-server-5.7.10-1.1.el7.x86_64.rpm


8. Then Install mysql-commercial-devel -5.7.10-1.1.el7.x86_64.rpm(This
Is Optional No Need to Install At Server)
yum localinstall
mysql-commercial-devel-5.7.10-1.1.el7.x86_64.rpm
9. Then start Mysql services
[root@testmysql mysql]# systemctl
start mysqld.service
[root@testmysql mysql]# systemctl
status mysqld.service

10. Start Mysql DB
[root@testmysql mysql]# service
mysqld start
11. At First Attempt root user does’nt have password, need to generate the password.
[root@testmysql mysql]# grep
'temporary password' /var/log/mysqld.log
2016-02-08T11:40:14.305890Z 1 [Note]
A temporary password is generated for root@localhost: o_a5!qh)uiS+(Here “o_a5!qh)uiS+”
This Is the Default Password)

12. Set the root password (login with generated password in
above command)
mysql> ALTER USER
'root'@'localhost' IDENTIFIED BY 'Root@000';

13. Now login again with new root user’s password and check
the list
of databases

14. Now create database.
Mysql>create database ABC;

15. Now Create User and check no.of users.
Mysql> create user 'abc_user'@'localhost' identified by 'C3nt3r$321';

16. Now provide Grant permission to a user(abc_user)for a particular database (e.g db name = abc)
Mysql> GRANT ALL PRIVILEGES ON abc.* TO 'abc_user'@'localhost';
For just reference:
GRANT [type of permission] ON [database name].[table name] TO ‘[username]’@'localhost’;
If you need to revoke permission, the structure is almost identical to granting it:
REVOKE [type of permission] ON [database name].[table name] FROM ‘[username]’@‘localhost’;
Just as you can delete databases with DROP, you can use DROP to delete a user altogether:

17. Now Connect ABC Database By Login via abc_user user

1
18. Now create table and select the table.
Table Creation:

Selecting table:

Droping Table:

19. Create new user for testing and try to acess abc database

20. By default all database files are stored in /var/lib/mysql/*(Need To Change The Location As Per File System)
20.1.Create file system as shown:

20.2. Set the permission to mysql user and group
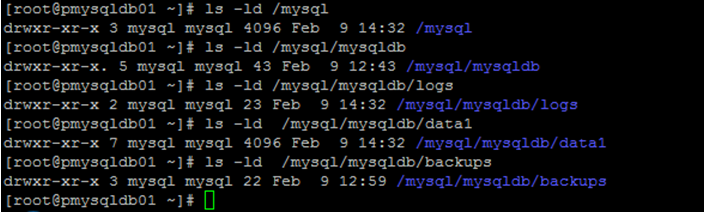
20.3. Filesystem
Description:
/mysql-----------------for socks, auto.cnf, and pem files
/mysql/mysqldb/data1---for datadir… i.e for databases
/mysql/mysqldb/logs----for error logs
/mysql/mysqldb/backups(optional)----for backups
20.4. Now stop the database if it is running:
Service
mysqld stop
20.5. Now copy files to new
locations:
cp
-p /var/lib/mysql/* /mysql/(don’t
copy the datadir/databases)
20.6. Copy all databases
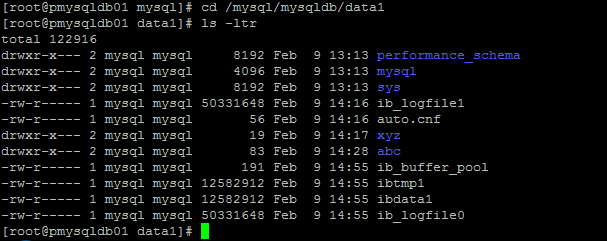
(default/user created) to new location
cp –pR
/var/lib/mysql/performance_schema
/mysql/mysqldb/data1/
cp
–pR /var/lib/mysql/sys
/mysql/mysqldb/data1/
cp
–pR /var/lib/mysql/mysql
/mysql/mysqldb/data1/
20.7. Now rename the actual
mysql dir to other name:
mv /var/lib/mysql / var/lib/mysql_old
20.8. Edit the /etc/my.cnf
file(Take backup before edit) to update the new location for database dir and
socket file etc…
cp -p /etc/my.cnf
/etc/my.cnf_backup
Edit And add The /etc/my.cnf to add below entries:
datadir=/mysql/mysqldb/data1
socket=/mysql/mysql.sock
log-error=/mysql/mysqldb/logs/mysqld.log
[client]
socket=/mysql/mysql.sock

20.9. Finally Start services
of mysql
service
mysqld start

20.10. All Files are created at new location and check
those files finally


How To Take Backup
For Mysql DB:
Login as root user
Create directory “/mysql/mysqldb/backups “
Run the below command to take backup it will generate backu file at specified
location
mysqldump -u root
--all-databases /mysql/mysqldb/backups /all-database.sql
#############################Copy Rights @ Sreenu Allipudi
2016###########################
No comments:
Post a Comment