Friday, 28 October 2016

OEM Cofiguration

1.  First Check Running jobs, No. Of Broken Jobs And No. Of Invalid Objects.


  Note: Make Sure No Invalid Objects For SYSMAN USer.


2. Down Database And Listener.


3. Check The SID & ORACLE_HOME And Take The Tar Backup Of ORACLE_HOME


4. Startup The Database.


      5. Check The Password Of SYSMAN , DBSNMP & SYS Users And Take The     Backup Of Users

 SQL> Select NAME,PASSWORD from user$ where name='SYSMAN';
  NAME                           PASSWORD
  ------------------------------ ----------------
  SYSMAN                         447B729161192C24

 SQL>  Select NAME,PASSWORD from user$ where name='DBSNMP';
 NAME                           PASSWORD
 ------------------------------ ----------------
 DBSNMP                         E066D214D5421CCC

 6. Change The Passwords Of SYSMAN And DBSNMP And Unlock Both The       Users.


7. Check The SYSTEM Tablespace Status(Must Be >1GB) and Check The Job_Queue_Process(Must Be >2).


8. Check The Listener Name, Port Number, Hostname & Emca(If Need Export Hostname)And Save Info For Further.


9. Change The Password For  SYS user(If Password Not Available)
Note: Make sure while changing password for Sys user at primary and should be change on standby as well)


10. Start Listener Before Configuring console.


11. Check Whether Already EMCA repository configured or not, If already configured drop old repository.


12. Now Create New Repository And Provide Appropriate Values As Below
  • SID=HILO
  • Port=1523
  • Password For SYS=changeoninstall
  • Password For SYSMAN=sysman
  • Du You Wish To Continue?[yes(Y)/no(N)]:Y


Note: Output Should Be Successfully

13. Now Configure DB Control And Provide Appropriate Details As Below
  • SID=HILO
  • Port=1523
  • Password For SYS=changeoninstall
  • Password For SYSMAN=sysman
  • Password For DBSNMP:dbsnmp
  • Email address For Notification(optional):No Need Just Press Enter Button
  • Out going Mail SMTP(optional):No Need Just Press Enter Button
  • Du You Wish To Continue?[yes(Y)/no(N)]:Y


14. Now Check dbconsole status and Start DB Console.

     emctl status dbconsole

     emctl start  dbconsole


15. Finally Open On Browser Throw This Link.


####################################### All The Best #######################################

Thursday, 27 October 2016

MYSQL DB Installation Creation


  1. Before Installation On Red hat Linux create file systems for Mysql.


/mysql –-----------------For Software Instalation (Home Location)
/mysql/mysqldb/logs—-----Database Logs
/mysql/mysqldb/data1—----Original Data
/mysql/mysqldb/backups—--Backup Location

2. While installing the Red Hat Linux By default Maria Db get installed, So uninstall maria db and remove the Mariadb Lib files.

yum remove mariadb mariadb-server  (Command For Un-Install Mariadb)
yum remove mariadb-libs   (Command For Remove Mariab Libraries)

3. Copy Mysql Full Software Package.


4. First Install mysql-commercial-common-5.7.10-1.1.el7.x86_64.rpm

yum localinstall mysql-commercial-common-5.7.10-1.1.el7.x86_64.rpm        


5. Then Install mysql-commercial-libs-5.7.10-1.1.el7.x86_64.rpm


yum localinstall  mysql-commercial-libs-5.7.10-1.1.el7.x86_64.rpm


6. Then Install -commercial-client-5.7.10-1.1.el7.x86_64.rpm


yum localinstall mysql-commercial-client-5.7.10-1.1.el7.x86_64.rpm


7. Then Install mysql-commercial-server-5.7.10-1.1.el7.x86_64.rpm

yum localinstall mysql-commercial-server-5.7.10-1.1.el7.x86_64.rpm


8. Then Install mysql-commercial-devel -5.7.10-1.1.el7.x86_64.rpm(This Is Optional No Need to Install At Server)

yum localinstall mysql-commercial-devel-5.7.10-1.1.el7.x86_64.rpm

9. Then start Mysql services

[root@testmysql mysql]# systemctl start mysqld.service
[root@testmysql mysql]# systemctl status mysqld.service


10. Start Mysql DB

[root@testmysql mysql]# service mysqld start

11. At First Attempt root user does’nt have password, need to generate the password.

[root@testmysql mysql]# grep 'temporary password' /var/log/mysqld.log
2016-02-08T11:40:14.305890Z 1 [Note] A temporary password is generated for root@localhost: o_a5!qh)uiS+(Here   “o_a5!qh)uiS+”  This Is the Default Password)


12. Set the root password (login with generated password in above command)

mysql> ALTER USER 'root'@'localhost' IDENTIFIED BY 'Root@000';


13. Now login again with new root user’s password and check the list
of databases


14. Now create database.


Mysql>create database ABC;


15. Now Create User and check  no.of users.


 Mysql> create user 'abc_user'@'localhost' identified by    'C3nt3r$321';


16. Now provide Grant permission to a user(abc_user)for a particular database (e.g db name = abc)

Mysql> GRANT ALL PRIVILEGES ON abc.* TO 'abc_user'@'localhost';

For just reference:

GRANT [type of permission] ON [database name].[table name] TO ‘[username]’@'localhost’;
If you need to revoke permission, the structure is almost identical to granting it:

REVOKE [type of permission] ON [database name].[table name] FROM ‘[username]’@‘localhost’;
Just as you can delete databases with DROP, you can use DROP to delete a user altogether:


17. Now Connect ABC Database By Login via abc_user user


1


18. Now create table and select  the table.

Table Creation:


Selecting table:


Droping Table:


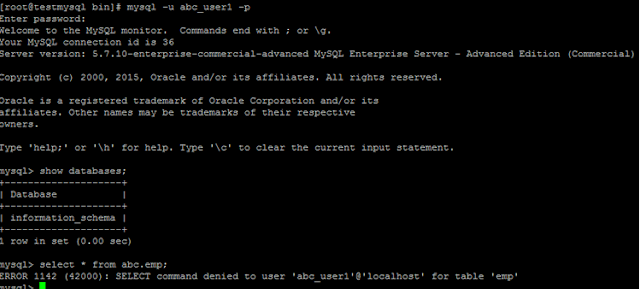
19. Create new user for testing and try to acess abc database


20. By default all database files are stored in /var/lib/mysql/*(Need To Change The Location As Per File System)

20.1.Create file system as shown:


          20.2. Set the permission to mysql user and group


20.3. Filesystem Description:
                                 
            /mysql-----------------for socks, auto.cnf, and pem files
/mysql/mysqldb/data1---for datadir… i.e  for databases
/mysql/mysqldb/logs----for error logs
/mysql/mysqldb/backups(optional)----for backups

20.4. Now stop the database if it is running:

Service mysqld stop

20.5. Now copy files to new locations:

cp -p /var/lib/mysql/* /mysql/(don’t copy the datadir/databases)

20.6. Copy all databases (default/user created) to new location
cp –pR /var/lib/mysql/performance_schema   /mysql/mysqldb/data1/       
cp –pR /var/lib/mysql/sys    /mysql/mysqldb/data1/
cp –pR /var/lib/mysql/mysql   /mysql/mysqldb/data1/

20.7. Now rename the actual mysql dir to other name:

mv  /var/lib/mysql / var/lib/mysql_old

20.8. Edit the /etc/my.cnf file(Take backup before edit) to update the new location for database dir and socket file etc…

cp -p /etc/my.cnf /etc/my.cnf_backup
      Edit And add The /etc/my.cnf to add below entries:
datadir=/mysql/mysqldb/data1
socket=/mysql/mysql.sock
log-error=/mysql/mysqldb/logs/mysqld.log
[client]
socket=/mysql/mysql.sock


20.9. Finally Start services of mysql

service mysqld start


20.10. All Files are created at new location and check those files finally


How To Take Backup For Mysql DB:
Login as root user
Create directory “/mysql/mysqldb/backups  “
Run the below command to take backup  it will generate backu  file at specified location
mysqldump -u root --all-databases  /mysql/mysqldb/backups /all-database.sql

#############################Copy Rights @ Sreenu Allipudi 2016###########################